TIBUG and EVMBUG System Monitors
![]() Introduction
Introduction
![]() TIBUG
TIBUG
![]() Introduction
Introduction
![]() Original Versions
Original Versions
![]() Modified Versions
Modified Versions
![]() Memory Use
Memory Use
![]() TIBUG Commands
TIBUG Commands
![]() M (Inspect/Change Memory)
M (Inspect/Change Memory)
![]() N (Inspect Memory - Hex/ASCII)
N (Inspect Memory - Hex/ASCII)
![]() O (Inspect Memory - Blocks)
O (Inspect Memory - Blocks)
![]() W (Inspect/Change Workspace Register)
W (Inspect/Change Workspace Register)
![]() R (Inspect/Change WP, PC and ST Registers)
R (Inspect/Change WP, PC and ST Registers)
![]() E (Execute)
E (Execute)
![]() B (Execute With Breakpoint)
B (Execute With Breakpoint)
![]() S (Single Step)
S (Single Step)
![]() C (Inspect/Change CRU)
C (Inspect/Change CRU)
![]() F (Find)
F (Find)
![]() H (Hex Arithmetic)
H (Hex Arithmetic)
![]() L (990 Tag Format Loader)
L (990 Tag Format Loader)
![]() D (TM 990 Disk Operating System)
D (TM 990 Disk Operating System)
![]() Q (Quit)
Q (Quit)
![]() ? (Display Command List)
? (Display Command List)
![]() XOP Utility Subroutines
XOP Utility Subroutines
![]() Write 1 Hexadecimal Character to Terminal
Write 1 Hexadecimal Character to Terminal
![]() Write 4 Hexadecimal Characters to Terminal
Write 4 Hexadecimal Characters to Terminal
![]() Read Hexadecimal Word from Terminal
Read Hexadecimal Word from Terminal
![]() Write 1 Character to Terminal
Write 1 Character to Terminal
![]() Read 1 Character from Terminal
Read 1 Character from Terminal
![]() Echo Character
Echo Character
![]() Write Message String to Terminal
Write Message String to Terminal
![]() Error Codes
Error Codes
![]() Example
Example
![]() EVMBUG
EVMBUG
![]() Introduction
Introduction
![]() Original Version
Original Version
![]() Modified Versions
Modified Versions
![]() Memory Use
Memory Use
![]() EVMBUG Commands
EVMBUG Commands
![]() IM (Inspect/Change Memory)
IM (Inspect/Change Memory)
![]() DM (Dump Memory)
DM (Dump Memory)
![]() IWR (Inspect/Change Workspace Register)
IWR (Inspect/Change Workspace Register)
![]() IR (Inspect/Change WP, PC and ST Registers)
IR (Inspect/Change WP, PC and ST Registers)
![]() EX (Execute)
EX (Execute)
![]() EXB (Execute With Breakpoint)
EXB (Execute With Breakpoint)
![]() SS (Single Step)
SS (Single Step)
![]() IC (Inspect/Change CRU)
IC (Inspect/Change CRU)
![]() FD (Find)
FD (Find)
![]() HEX (Hex Arithmetic)
HEX (Hex Arithmetic)
![]() DMC (Dump RAM Image)
DMC (Dump RAM Image)
![]() LMC (Tag Format Loader)
LMC (Tag Format Loader)
![]() TNF (Toggle ASR Flag)
TNF (Toggle ASR Flag)
![]() XAE (Line-By-Line Assembler, retain symbol table)
XAE (Line-By-Line Assembler, retain symbol table)
![]() XA (Line-By-Line Assembler, clear symbol table)
XA (Line-By-Line Assembler, clear symbol table)
![]() XRA (Disassembler)
XRA (Disassembler)
![]() XCL (Terminal Mode)
XCL (Terminal Mode)
![]() XOP Utility Subroutines
XOP Utility Subroutines
![]() Error Codes
Error Codes
![]() Example
Example
![]() PC Keyboard Sender Utility
PC Keyboard Sender Utility
![]() Introduction
Introduction
![]() Sending a 990 Tagged Object Code File (Target Computer Using the Modified TIBUG 'L' Command)
Sending a 990 Tagged Object Code File (Target Computer Using the Modified TIBUG 'L' Command)
![]() Sending a 990 Tagged Object Code File (Target Computer Using the TIBUG 'M' Command)
Sending a 990 Tagged Object Code File (Target Computer Using the TIBUG 'M' Command)
![]() Sending a Hex Dump File (Target Computer Using the TIBUG 'M' Command)
Sending a Hex Dump File (Target Computer Using the TIBUG 'M' Command)
![]() Sending a Text File
Sending a Text File
This page describes the TIBUG and EVMBUG system monitors which have been
ported to various systems, and a PC utility to transfer files on the PC to the
terminal program, and hence to the computer on the end of the serial interface.
TIBUG is a debug monitor which provides an interactive interface between the user and the computer through a serial interface. It was first used with the TM 990 range of microcomputer modules, and the listing for the earliest version is dated June 1977. It was supplied on a pair of 1K byte 2708 EPROMs under part number TM 990/401.
TIBUG provides a number of commands, and a set of utility subroutines accessed through XOP calls for reading and writing to the terminal.
Three original versions of TIBUG are known to exist:
The original versions supports the following Baud rates with 7 data bits, even parity and 2 stop bits: 110, 300, 600, 1200, 2400, 4800, 9600, 19200. The Baud rate is automatically detected at power-on by the user pressing a key which has a '1' as the least-significant data bit, such as "A" or <Return>.
A version of TIBUG is also included in TI's Portable Speech Lab. This version includes an additional command to download data byte-by-byte rather than word-by-word.
I have used modified versions of TIBUG in the following projects:
TIBUG uses the memory area >FF9E - >FFFF for workspaces and other data storage.
Two commands from the original TIBUG are omitted from the list below - 'D' (dump memory to cassette) and 'T' (toggle Baud rate for TI 733ASR terminal).
Note that all operands are hexadecimal.
Format 1: M [<start address>]<Return>
Format 2: M [<start address>],[<stop address>]<Return>
Format 1: displays memory address, contents, and opens the memory location for a change. The start address defaults to >0000 if not specified. Pressing <Return> writes any specified new value and returns to the command prompt. Pressing <Space> writes any specified new value and display the next address. Pressing <Minus> writes any specified new value and displays the previous address.
Format 2: displays the contents of memory from the start address to the stop address. Both addresses default to >0000 if not specified. Each line of output consists of the address of the first data word followed by four or eight (depending on the version) data words. Pressing any key during a memory listing terminates the process.
Format: N [<start address>],[<stop address>]<Return>
Displays the contents of memory from the start address to the stop address, in both hex and ASCII formats. Both addresses default to >0000 if not specified. The display pauses after each screenful of output with a prompt to press <P> to show the previous screen of memory, <N> to show the next screen of memory, or <Q> to return to the command prompt.
Format: O
Lists memory in 2K blocks from >0000 to >F7FF, and indicates whether each block is read-only (ROM) or read-write (RAM).
Format: W [<register number>]<Return>
If no register number is specified, the command displays the contents of all the workspace registers and returns to the command prompt. The workspace is at the location pointed to by the workspace pointer set through the 'R' command (this defaults to one of TIBUG's own workspaces at >FFB0 at power on).
If a register number is specified, the command displays the contents of the specified register. A new value can be specified. Pressing <Return> writes any specified new value and returns to the command prompt. Pressing <Space> writes any specified new value and display the next register. Pressing <Minus> writes any specified new value and displays the previous register.
Format: R
Displays first the value of the workspace pointer (WP). A new value can be specified. Pressing <Return> writes any specified new value and returns to the command prompt. Pressing <Space> writes any specified new value and displays the value of the program counter (PC) followed by the status register (ST), which can be inspected and changed in the same way.
Format: E
Starts program execution using the values in the workspace pointer, program counter and status register set through the 'R' command.
To return from a user program to TIBUG, use the instruction B @>0080.
Format: B [<breakpoint address>]<Return>
If a breakpoint address is specified, the command installs a breakpoint at the specified address then starts program execution using the values in the workspace pointer, program counter and status register set through the 'R' command. When the breakpoint address is executed, the contents of the workspace pointer, program counter and status register are displayed and control returns to the command prompt. To continue running the program, either use the 'B' command again to break at another point later in the program, or use the 'E' command.
The breakpoint address must be in RAM and must be the first word of an instruction.
If no breakpoint address is specified, the 'B' command performs the same as the 'E' command.
Format: S
Executes one instruction using the values in the workspace pointer, program counter and status register set through the 'R' command, the prints the contents of the workspace pointer, program counter and status register. Successive instructions can be executed by repeated 'S' commands.
Note that incorrect results are obtained when the 'S' command causes execution of an XOP instruction.
Format: C [<CRU base address>],[<count>]<Return>
Displays <count> CRU bits, right justified, read from the CRU base address. The base address defaults to >0000 if not specified, and the count to 0 (=16 CRU bits). A new value for the specified bits can be specified. Pressing <Return> writes any specified new value and returns to the command prompt. Pressing <Space> or <Minus> writes any specified new value and displays the same CRU bits again.
Format: F [<start address>],[<stop address>],[<value>]{<Return> or <Minus>}
Compares the contents of memory locations from the start address to the stop address with the value specified, and prints the memory addresses whose contents equal the given value. The default for all three parameters, if not specified, is >0000.
If the command entry is terminated with <Return>, the search will be for a word with the specified value. If the command entry is terminated with <Minus>, the search will be for a byte with the value in the right byte of the specified value.
Format: H [<number 1>],[<number 2>]<Return>
Prints the sum and difference of the two numbers given.
Format: L
Loads object code in 990 tagged object record format (such as that produced by the Asm994a assembler, which is part of the Win994a TI-99/4A simulator) over the serial interface.
Entering the command displays two prompts:
The default for the two offset addresses is >0000. If the defaults are required, just press <Return> at each prompt.
When the code download completes, the addresses of the first and last data words downloaded are printed, then any program IDT (identifier) specified in the object code.
Further information on the use of the 'L' command is provided here.
Format: D
Runs the TM 990 Disk Operating System, which is assumed to be loaded in memory starting at address >1000.
Format: Q
Returns to the program menu screen.
Format: ?
Displays a list of the commands available.
TIBUG provides seven utility subroutines for reading and writing to the terminal. These subroutines are called through the XOP (eXtended OPeration) instruction.
Most of the XOP format examples shown below use a register for the source address, however, all XOPs can also use a symbolic memory address or any of the other addressing formats available for the XOP instruction.
Format: XOP Rn,8
The least significant 4 bits of user register Rn are converted to their ASCII-coded hexadecimal equivalent ("0" to "F") and output to the terminal. Control returns to the instruction following the XOP instruction.
Example: if register Rn contains the value >203C, the character "C" is output to the terminal.
Format: XOP Rn,10
The 4-digit hexadecimal representation of the contents of user register Rn is output to the terminal. Control returns to the instruction following the XOP instruction.
Example: if register Rn contains the value >203C, the characters "203C" are output to the terminal.
Format: XOP Rn,9
DATA NULL
DATA
ERROR
(next instruction)
The binary representation of the last 4 hexadecimal digits input from the terminal is accumulated in user register Rn. The termination character is returned in the most significant byte of register Rn+1. Valid termination characters are <Space>, <Minus>, <,> and <Return>. Control returns as follows:
Examples:
XOP R6,9
DATA >8000
DATA >8010
CLR
R0
User input: "12C<Return>". Control returns to the instruction CLR R0 with register R6 containing >012C and R7 containing >0D00.
User input: "12345678<Return>". Control returns to the instruction CLR R0 with register R6 containing >5678 and R7 containing >0D00.
User input: "1234Z". Control returns to address >8010 (due to the invalid termination character "Z") with registers R6 and R7 unaltered.
User input: "<Return>". Control returns to address >8000 (due to no hexadecimal input) with register R6 unaltered and R7 containing >0D00.
Format: XOP Rn,12
The ASCII character in the most significant byte of user register Rn is output to the terminal. The least significant byte of Rn is ignored. Control returns to the instruction following the XOP instruction.
Example: if register Rn contains the value >5349, the character "S" is output to the terminal.
Format: XOP Rn,13
The ASCII representation of the next character input from the terminal is placed in the most significant byte of user register Rn. The least significant byte of Rn is set to zero. Control returns to the instruction following the XOP instruction after a character is read.
Example: if the next character input is "S", register Rn will contain the value >5300.
Format: XOP Rn,11
This is a combination of XOPs 12 (read character) and 13 (write character). The ASCII representation of the next character input from the terminal is placed in the most significant byte of user register Rn then written (echoed back) to the terminal. Control returns to the instruction following the XOP instruction after a character is read and written.
Format: XOP @MESSAGE,14
The ASCII character string whose first character is at the symbolic address MESSAGE is output to the terminal. The string must be terminated with a byte >00. Control returns to the instruction following the XOP instruction after the character string is written.
Example:
XOP @MESS,14
...
...
MESS TEXT 'HELLO WORLD'
BYTE >00
The character string "HELLO WORLD" is output to the terminal.
Several error messages are included in the TIBUG monitor to alert the user to incorrect operation. In the event of an error, the word "ERROR" is output followed by a single digit giving the error number. These errors are:
This example is based around the following source code which prints two text strings, reads and prints characters from the terminal until a <Space> is entered, then returns to TIBUG:
AORG >8000
Assemble code at >8000.
LWPI WS
Load workspace.
XOP @TEXT1,14
Print first text string.
XOP
@TEXT2,14 Print second text string.
LOOP
XOP R1,13 Read character from
keyboard into MSB of R1.
CI
R1,>2000 <Space> character?
JEQ EXIT If yes, jump to
exit.
XOP R1,12
Print character to terminal.
JMP
LOOP Loop around for next
character.
EXIT B @>0080
Return to TIBUG.
TEXT1 BYTE >0D,>0A
First text string.
TEXT 'HELLO '
BYTE >00
TEXT2 TEXT 'WORLD' Second
text string.
BYTE >0D,>0A
BYTE >00
WS BSS 32
Workspace.
END
When this source code is assembled, it produces the following object code:
>02E0, >802E, >2FA0, >801C, >2FA0, >8025, >2F41, >0281, >2000, >1302, >2F01, >10FA, >0460, >0080, >0D0A, >4845, >4C4C, >4F20, >0057, >4F52, >4C44, >0D0A, >0000
Load the object code into memory using the 'M' command, starting at address >8000, as shown below. User input is shown underlined. The current memory contents is shown as "xxxx" as it may be any random value.
?>M 8000<Return>
8000=xxxx 02E0<Space>
8002=xxxx 802E<Space>
8004=xxxx 2FA0<Space>
8006=xxxx 801C<Space>
8008=xxxx 2FA0<Space>
800A=xxxx 8025<Space>
800C=xxxx 2F41<Space>
800E=xxxx 0281<Space>
8010=xxxx 2000<Space>
8012=xxxx 1302<Space>
8014=xxxx 2F01<Space>
8016=xxxx 10FA<Space>
8018=xxxx 0460<Space>
801A=xxxx 0080<Space>
801C=xxxx 0D0A<Space>
801E=xxxx 4845<Space>
8020=xxxx 4C4C<Space>
8022=xxxx 4F20<Space>
8024=xxxx 0057<Space>
8026=xxxx 4F52<Space>
8028=xxxx 4C44<Space>
802A=xxxx 0D0A<Space>
802C=xxxx 0000<Return>
Back at the TIBUG command prompt, use the 'R' command to inspect the workspace pointer, program counter and status registers. The workspace pointer is displayed first. The default value of >FFB0 is fine for the example program as the first thing the program does is load its own workspace. If the LWPI instruction was omitted from the program, the workspace pointer could be set here instead. Press <Space> to display the program counter. Enter the start address 8000 followed by <Space> to display the status register. No special value is needed so press <Space> again to return to the command prompt (the value specified for the status register is only significant if the first instruction in the program is an instruction whose action depends on the value of a status bit, such as one of the conditional jump instructions).
To run the program, use the 'E' command. This should display the text "HELLO
WORLD", then echo any key pressed (except <Space>) back to the terminal.
When <Space> is pressed, the program returns to TIBUG.
To demonstrate the breakpoint command, a convenient address to break into the program is at address >8008, where it prints the second text string. To set the breakpoint and run the program, type B 8008<Return> (the <Space> after the "B" is added automatically). The program runs from the address set in the program counter (check or change it using the 'R' command) and displays the text "HELLO", then breaks and displays the contents of the workspace pointer, program counter and status register at the breakpoint. Type 'E' to continue running the program from the break point.
EVMBUG is, like TIBUG, a debug monitor which provides an interactive interface between the user and the computer through a serial interface. The only product that used it seems to be the TMS 9995 evaluation module (TMAM 6095), which is a standalone microcomputer board that supports evaluation of TMS 9995 software and hardware features as well as prototyping of TMS 9995 interfaces. It was supplied on a 4K byte and 2K byte EPROM under part number 1603154.
EVMBUG provides a number of commands, and a set of utility subroutines accessed through XOP calls for reading and writing to the terminal.
One original version of EVMBUG is known to exist:
The original version supports the following Baud rates with 7 data bits, even parity and 2 stop bits: 110, 300, 600, 1200, 2400, 4800, 9600, 19200. The Baud rate is automatically detected at power-on by the user pressing a key which has a '1' as the least-significant data bit, such as "A" or <Return>.
I have used modified versions of EVMBUG in the following projects:
The 'SS' (Single Step) command is only supported by the TMS 9995 evaluation module and the Mini-Cortex project, which include the necessary hardware support.
EVMBUG uses the memory area >EC00 - >EC54 for workspaces and other data storage.
Notes:
Format: IM [<start address>]<Return>
Displays memory address, contents, and opens the memory location for a change. The start address defaults to >0000 if not specified. Pressing <Return> writes any specified new value and returns to the command prompt. Pressing <Space> writes any specified new value and display the next address. Pressing <Minus> writes any specified new value and displays the previous address.
Format: DM [<start address>],[<stop address>]<Return>
Displays the contents of memory from the start address to the stop address. Both addresses default to >0000 if not specified. Each line of output consists of the address of the first data word followed by eight data words. Pressing any key during a memory listing terminates the process.
Format: IWR [<register number>]<Return>
If no register number is specified, the command displays the contents of all the workspace registers and returns to the command prompt. The workspace is at the location pointed to by the workspace pointer set through the 'IR' command (this defaults to one of EVMBUG's own workspaces at >EC00 at power on).
If a register number is specified, the command displays the contents of the specified register. A new value can be specified. Pressing <Return> writes any specified new value and returns to the command prompt. Pressing <Space> writes any specified new value and display the next register. Pressing <Minus> writes any specified new value and displays the previous register.
Format: IR<Return>
Displays first the value of the workspace pointer (WP). A new value can be specified. Pressing <Return> writes any specified new value and returns to the command prompt. Pressing <Space> writes any specified new value and displays the value of the program counter (PC) followed by the status register (ST), which can be inspected and changed in the same way.
Format: EX<Return>
Starts program execution using the values in the workspace pointer, program counter and status register set through the 'IR' command.
To return from a user program to EVMBUG, use the instruction B @>0080 or B @>0142.
Format: EX [<breakpoint address>]<Return>
If a breakpoint address is specified, the command installs a breakpoint at the specified address then starts program execution using the values in the workspace pointer, program counter and status register set through the 'IR' command. When the breakpoint address is executed, the contents of the workspace pointer, program counter and status register are displayed and control returns to the command prompt. To continue running the program, either use the 'EXB' command again to break at another point later in the program, or use the 'EX' command.
The breakpoint address must be in RAM and must be the first word of an instruction.
If no breakpoint address is specified, the 'EXB' command performs the same as the 'EX' command.
Format: SS<Return>
Executes one instruction using the values in the workspace pointer, program counter and status register set through the 'IR' command, the prints the contents of the workspace pointer, program counter and status register. Successive instructions can be executed by repeated 'SS' commands.
Note that incorrect results are obtained when the 'SS' command causes execution of an XOP instruction.
Format: IC [<CRU base address>],[<count>]<Return>
Displays <count> CRU bits, right justified, read from the CRU base address. The base address defaults to >0000 if not specified, and the count to 0 (=16 CRU bits). A new value for the specified bits can be specified. Pressing <Return> writes any specified new value and returns to the command prompt. Pressing <Space> or <Minus> writes any specified new value and displays the same CRU bits again.
Format: FD [<start address>],[<stop address>],[<value>]{<Return> or <Minus>}
Compares the contents of memory locations from the start address to the stop address with the value specified, and prints the memory addresses whose contents equal the given value. The default for all three parameters, if not specified, is >0000.
If the command entry is terminated with <Return>, the search will be for a word with the specified value. If the command entry is terminated with <Minus>, the search will be for a byte with the value in the right byte of the specified value.
Format: HEX [<number 1>],[<number 2>]<Return>
Prints the sum and difference of the two numbers given.
Format: DMC [<start address>],[<stop address>],[<entry address>],IDT=[<name>]<Space>
Dumps data in 990 object record format from the memory start address to the stop address. The entry address is the address in memory of the start of the program.
Format: LMC [<bias>]<Return>
Loads data in 990 tagged object record format into memory. The optional bias parameter is the relocation bias (starting address in RAM), and defaults to >0. Nothing is displayed as data is loaded. After the data has loaded, the module identifier (IDT) is printed.
Note that this loader is NOT compatible with the PC Keyboard Sender utility described below.
Format: TNF<Return>
If a 1200 Baud terminal is detected, the monitor is set up to automatically insert three nulls after every character output to the terminal. These nulls are inserted to allow correct operation of the module with a TI 733 ASR data terminal. This command toggles this feature off for when working with a true 1200 Baud peripheral device.
Format: XAE [<start address>]<Return>
Executes the resident Line-By-Line Assembler, starting assembly at the specified start address, and retaining any symbol table from a previous run of the assembler. For details of the assembler, see the 'XA' command below.
Format: XA [<start address>]<Return>
Executes the resident Line-By-Line Assembler, starting assembly at the specified start address, and clearing the symbol table.
The assembler is largely the same as the Line-By-Line Assembler provided with the TI-99/4A Mini Memory cartridge. The instructions for this are available here. Noted differences to the TI-99/4A assembler are (apart from the obvious references to the TI-99/4A computer itself):
Format: XRA [<start address>],[<stop address>]<Return>
Uses the resident disassembler to disassemble the code from the start address to the stop address.
Format: XCL<Return>
Switches the module operation mode to work with a TI AMPL development system connected to RS-232 port P2.
EVMBUG provides the same XOP utility routines as TIBUG, as described here.
EVMBUG uses the same error codes as TIBUG, as described here.
An example of entering and running a simple program is shown below. User input is shown underlined (and must be followed by pressing <Return>). On lines where no label is to be input, remember to press <Space> to step over the symbol field before entering the instruction.
MON? XA ED00 Start assembling at address >ED00.
ED00 2FA0 XOP @TX,14 Print the text message at label TX.
ED02R0000 ('R0000' indicates label TX is currently not defined)
ED04 2FA0 XOP @CR,14 Print the text message at label CR.
ED06R0000 ('R0000' indicates label CR is currently not defined)
ED08 0460 B @>0142 Return to the monitor.
ED0A 0142
ED0C 4845 TX TEXT 'HELLO WORLD' Define text message.
ED0E 4C4C
ED10 4F20
ED12 574F
ED14 524C
ED16 4400 (Null byte to terminate text string added automatically)
ED02*ED0C (Address >ED02 now filled in with address of label TX)
ED18 0D0A CR DATA >0D0A Data for text <CR><LF>.
ED06*ED18 (Address >ED06 now filled in with address of label CR)
ED1A 0000 DATA 0 Null byte to terminate text string.
ED1C END 0000 End program entry. Number of unresolved references displayed.
MON? IR Change WP, PC and ST registers.
W=0A7A EC00 (Press <Space> after entering address)
P=0000 ED00 (Press <Space> after entering address)
S=0922 0 (Press <Return> after entering value)
MON? EX Execute program.
HELLO WORLD
MON?
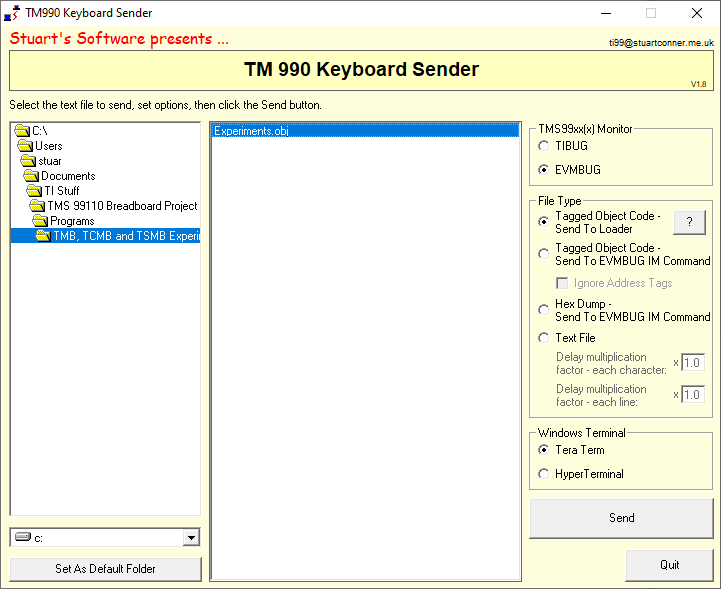
The Keyboard Sender utility is a somewhat crude program for transferring files on the PC to the terminal program, and hence to the computer on the end of the serial interface. The program is written in venerable Visual Basic 6.0, and has developed over time to help download to my various TMS 99xx-based systems. Specifically, the program supports sending the following types of file:
The program works with the Tera Term and HyperTerminal terminal programs.
The program can be downloaded here. Unzip the executable and the associated Visual Basic DLL to a convenient folder.
WARNING! WARNING! WARNING! The program in effect sends keystrokes to the terminal program. While a file is being sent, do not do anything that will move the 'focus' away from the terminal program to another application, or the keystrokes will be sent to that application instead. The program displays a "STOP!" button while sending a file, in case you need to stop it in a hurry!
This option requires the target computer to be running TIBUG with the modified 'L' command to accept input from the terminal program.
To send a file:
Two variations are available with this option:
To send a file:
Depending on the speed of the target computer, the two Delay multiplication factor values can be increased or decreased to adjust the delay between sending individual characters or at the end of a data word. Increasing a value increases the delay, and decreasing a value decreases the delay. Experiment increasing one of both delays if characters are dropped or errors are displayed during a download. Decreasing the values can help speed up large downloads as long as the target computer can handle the increased speed.
To send a hex dump file:
As with the previous option, the two Delay multiplication factor
values can be increased or decreased if required to adjust the delay between
sending individual characters or at the end of a data word.
To send a text file:
